Unless you are an experienced deck installer, you may find yourself pondering how to build a composite deck and how to install it using composite decking clips. The options may seem a bit overwhelming.
Decking clips questions for beginners:
- Do you top-fix?
- Do you use the hidden fix system?
- Can you use the same clip to fix a timber subframe as a metal subframe? What about gap spacing?
If you are a real DIY ‘newbie’, you may even wonder if you need any special tools. Whatever your level, this blog will point you in the right direction.
NewTechWood is designed to be installed using the hidden-fix clip system. This provides a modern, cleaner look because the screws and clips are cleverly concealed in the side grooves of each board. This means while the boards are held securely in place, there are no unsightly screw heads visible on the surface of your deck.
The hidden-fix system was designed with builders and installers in mind because it provides a quick, easy process resulting in a shorter installation time.
Other benefits of using the NewTechWood hidden-fix system include:
- Prevention of board warping
- Uniform spacing of gaps between boards
- Suitability for both timber and metal joists. You can choose between a standard deck gap and a mini gap
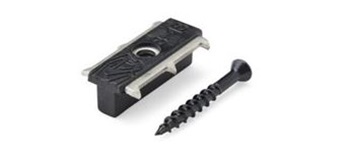
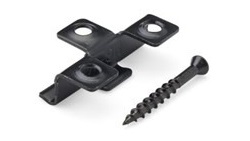
NewTechWood chooses two gap spacings between the boards – the regular 5.5mm or the Mini Gap 1.5mm spacing. The Cobra T-Clips are used for the 5.5mm gap, and the Mini Gap clips (MG1 and MG2) are used for the 1.5mm gap.
The mini gap clip system is often chosen for specific commercial installations where public safety may be a consideration, or for homeowners living in areas where twigs, leaves, gumnuts etc., getting stuck between the composite decking boards is an issue. It is also a matter of personal preference.

Cobra T-Clip 5.5mm gap and Mini Gap Clip 1.5mm gap
Let’s take a quick look now at each of these clip systems.
Cobra T-Clip system

The Cobra T-Clip system provides a uniform 5.5mm gap between the boards. This is the standard gap size for most Australian decks.
These clips will enable you to install any composite deck without pre-drilling, 30% faster!
Clips are available for both timber fixing and metal fixing, so when purchasing, you should specify if you are fixing to a timber or a metal frame.
Important note: Cobra Clips are not warranted for fixing to Stratco Pro-Beam or similar double-wall steel profiles.
Cobra Clip installation guides
Read the Cobra Clip installation guides online or watch video instructions below:
Mini Gap decking clip system

The Mini Gap Clip system uses the MG1 and MG2 clips, providing a minimal 1.5mm gap between boards.
So, when safety is an issue (think women’s stiletto heels for example), you don’t want to lose small valuables between the boards, or you live in a leafy area where twigs and seeds will catch in the decking gaps, the mini gap system is your answer.
As with the Cobra system, the Mini Gap Clips are available for both timber and metal fixing and you need to specify your requirements when purchasing.
Top fixing
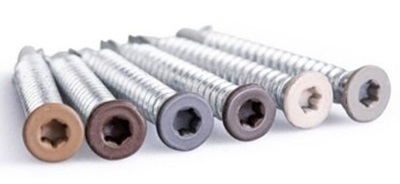
You will be pleased to know top fixing is not off the menu. We have coloured head screws to match the colour of your deck for this exact purpose, especially for fascia boards and square edge boards that do not have grooved sides to accommodate the secret fix clips, and therefore, need to be top fixed.
These are specially designed screws for both natural timber and capped composite boards like NewTechWood. These coloured head screws blend with the colour of your deck boards, providing a much more aesthetically pleasing appearance.
NewTechWood coloured head screws are available in two ranges:
- Deck Hedz stainless steel grade: 304 (CDS and CS) and Carbon Steel (CSM), and
- Anchormark CSM AMTT Carbon Steel (CSM AMTT)
Deck Hedz CS and CSM screws
These coloured head fascia screws are 8g x 50mm, stainless steel grade 304 and are suitable for timber fix. Use them on fascia boards, screening, stair treads and picture framing.
Unlike our Cobra T-Clip hidden system, which does not require pre-drilling, these particular Deck Hedz top fix screws do require pre-drilling.
Note: Pre-drill each hole slightly larger than the screw to allow for the natural expansion and contraction of the boards (something which also affects all other types of timber, except softwoods).
Anchormark CSM AMTT screws

These coloured head deck screws are carbon steel, 10g x 60mm, with additional zinc coated steel tip and designed for metal fixing. The self-drilling tip makes for easy installation and they are suitable for steel joists up to 2mm thickness – if thicker than 2mm, then you must pre-drill each hole.
NewTechWood offers a range of decking clips and screws for the various board profiles and colours, gap spacings, and even the special marine boards.
How many clips do I need?
You can use our online calculator to assist you. For example, if you are installing a NewTechWood Terrace (US49) deck with a traditional 5.5mm gap, you would use approximately 17 Cobra T-Clips per square metre. They are sold in bags of 75 and 250.
If you were installing the same deck but with the Mini Gap option, you would use approximately 19 x MG1 Mini Gap clips per square metre, plus 1 x MG2 clip per board length. (You only need one MG2 clip per board.)
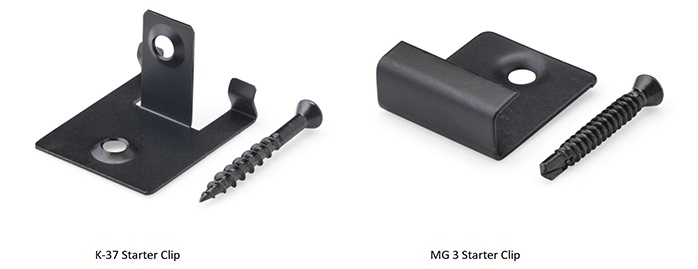
All installations, whether you are going with a standard or mini gap layout, will need starter clips. We offer two varieties, the MG3 and the K37. The K37 also acts as an end clip and a starter clip. These are also available for both timber fixes and metal fixes.
Note: Technically, you can start the installation with a K37, but not if the first board is flush against the wall. Using the K37, you must allow a minimum of 1.5mm between the wall and the first board to slip the clip into place.

Your NewTechWood reseller can also help you calculate how many clips you need for your project. If you are a builder or installer, help from our team is just a call away.
Installation in a nutshell
Let’s assume you’re building a standard deck. Tool-wise, standard carpentry tools are all you need, e.g., drills, drivers, rubber hammers, etc. Use the driver that comes with your box of clips.
- You commence the install using a starting clip (MG3/K37). Then, you take the first grooved board and push it into the starting clip, which holds the first deck board in place.
- Next, insert a Cobra T-Clip hidden fastener into the grooved edge of the deck board and slide the second board into the hidden fastener. Once you have screwed the hidden fastener down into the joist from the top, you won’t see the fastener, but it is now holding the first and second deck boards securely together.
- You can tighten the second board with a rubber mallet to ensure a consistent gap of 6mm max. between the two boards before adding the third deck board, and so on.
- Repeat this process for all your deck boards, and then for the final board, using the start/end fasteners, you will screw the fastener in from the side to fix the last board in place.
- Finally, you can install the fascia using two composite screws – every 400mm centre to centre. Fascia boards always need to be pre-drilled and countersunk before they can be face-fixed.
Note: All fasteners should be on their own independent joists. When two board ends meet, there must be a sister joist. The end of each board must sit on its own joist. The full installation guide provides detailed instructions with easy-to-read diagrams.
On the other hand, if you are a brand new DIYer and, after viewing the instructions and watching the videos, find yourself wondering if you might be biting off more than you can chew, don’t forget we have recommended NewTechWood installers all over Australia who will be happy to quote you!
Originally published on NewTechWood.

